Speed At Last
** Updated Oct 2, 2016 **
In a previous post, I described the state of my home Internet service. Today Spectrum (née Time Warner Cable) came by and installed my new high-speed service. This should tide me over until Google Fiber finally comes through.
The Installation
The installation went well; I already had my modem plugged in and ready to go. Upon seeing my RG6 patch panel, though, the tech immediately started in on a spiel about how it was incompatible with his stuff. He probably thought it was a splitter or something, but I showed him how a coax patch panel is fundamentally no different to a coax wall plate which he’d deal with in any other house. Once he connected up the copper, everything came to life without a hitch.
Someone will be by with a trencher at a later date to bury the orange coax hookup that is now just draped across my lawn.
The Router
There are plenty of overviews, unboxing videos, and summaries of the Ubiquiti EdgeRouter X on the Internet already; I don’t need to reinvent the wheel, so I’ll just call out some of the features that convinced me to get one:
- Small footprint, low power use.
- Highly configurable, via GUI and CLI.
- Sufficient throughput and hardware offloading potential.
- Low price.
- Brand reputation.
Initial Setup
Not much to it: unbox it, plug it in, connect to the first port to start configuring. By default the thing operates on 192.168.1.1 so whatever computer you plug in can be manually set to 192.168.1.2 and you can get to work with a web browser or an SSH session.
Before doing anything, I downloaded the latest (v1.9.0) firmware for the router and installed it. After rebooting, I was ready to do the initial config.
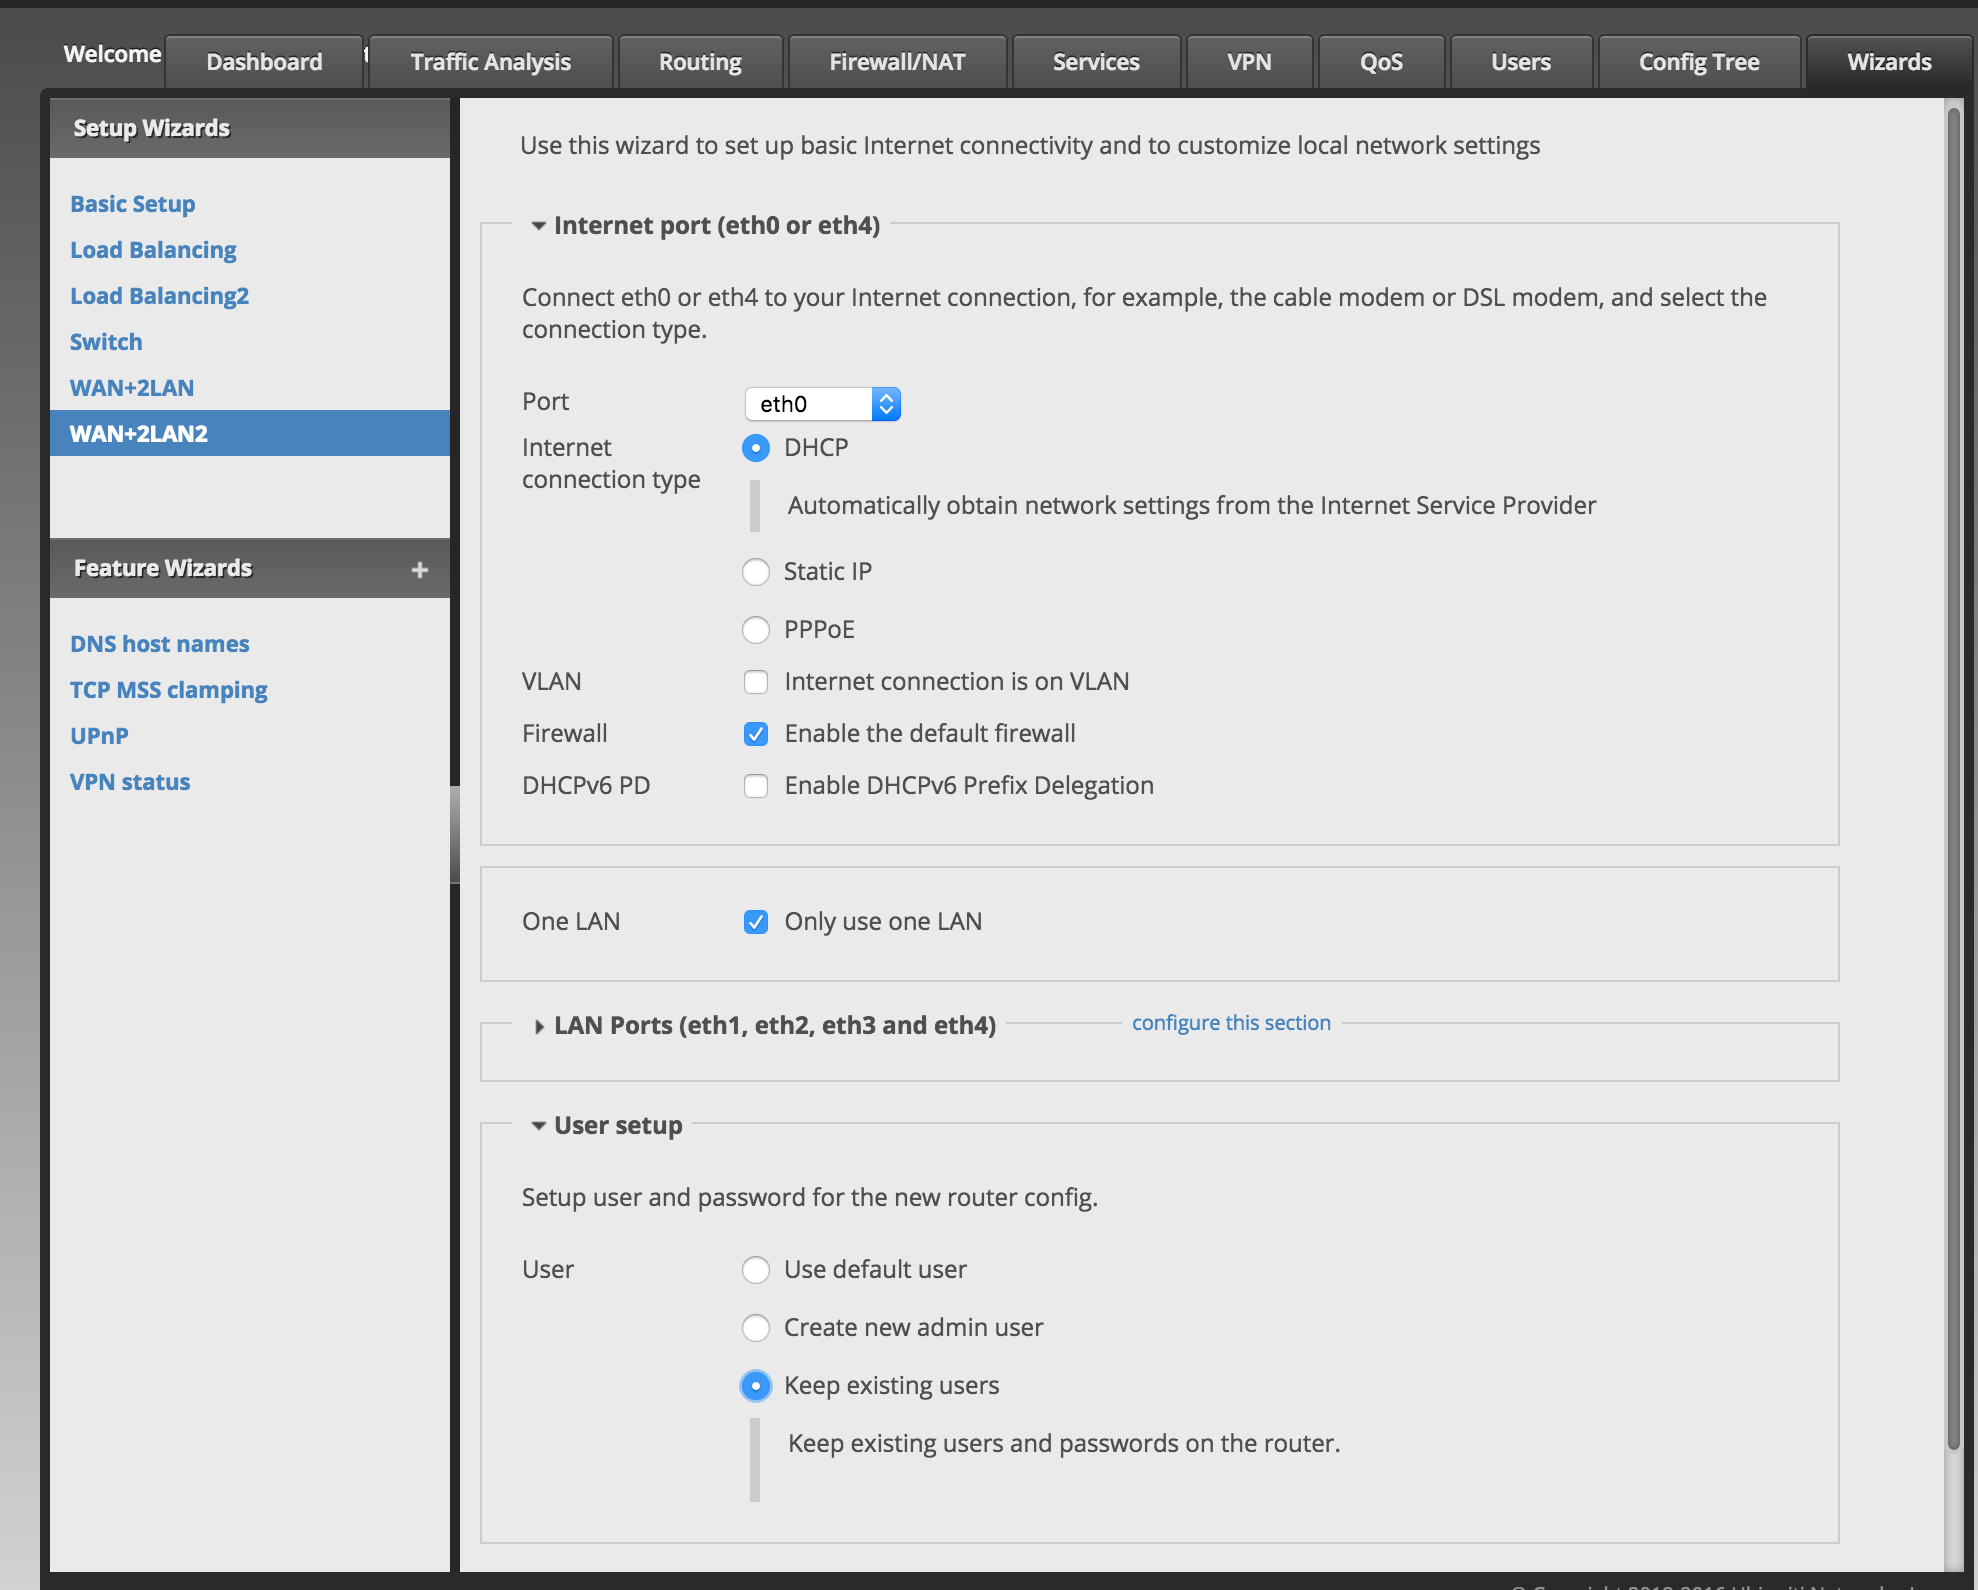
One of the provided “wizards” is a basic LAN/WAN firewall configuration (this wizard is named “WAN+2LAN2” for some reason) that sets up everything you’re likely to need to get started:
- ETH0 is the public Internet (WAN) port;
- ETH1-4 are “connected” together as switch ports;
- A virtual IP address for the switch is established on virtual interface
switch0; - Firewall configured to block all unsolicited traffic;
- NAT configured to handle all IPv4 outbound traffic.
The first time I tried this, I used the wizard’s option to add a user account – I tried to add a user named “root” with a strong generated password. After reboot I could not log into the router at all, either with the default ‘ubnt’ or the new ‘root’ credentials, and had to do a factory reset and start over. The second time through the wizard I elected to leave the user accounts as-is and configure them later.
I also checked the wizard option to enable prefix delegation for IPv6, but I discovered later that this didn’t actually do anything.
First Tests
Immediately following the Internet installation I performed a Wi-Fi speed test at both fast.com and speedtest.net and got around 85 mbps down and 20 up. This confirmed that the connection was working, and I didn’t expect to see full throughput over Wi-Fi.
After patching my office switch into the router (effectively switching from U-Verse to Spectrum) and getting a new DHCP lease on my desktop computer, I did the speed tests again, with results of 230 mbps down and 23 mbps up. So I’m getting the speeds for which I’m paying. Excellent!
The other question to answer is what kind of load does high throughput put on the router? I ran the test again and watched the CPU meter on the router’s admin page. I noted a peak at 48% CPU utilization during the download test.
Enabling Hardware Offload
The big brothers to the EdgeRouter X have hardware offload available for a lot of features, and it’s a relatively new addition to the smaller ERX box. This router can offload ipsec and hwnat to hardware, which means a performance bump for VPNs and general IPv4 activity! These features are off by default, but can be turned on. I used the CLI to do it:
configure
set system offload hwnat enable
set system offload ipsec enable
commit
save
exit
The CLI is pretty great. It’s more similar in behavior to Juniper’s JunOS than Cisco’s IOS. The Ubiquiti routers run Linux, and Juniper routers run BSD, so it’s not surprising they’d be superficially similar in this regard. To access it, you just SSH to the router’s inside IP address and log in, just like any other host.
After rebooting the router, I tried the speed tests again. First time I didn’t see the CPU meter rise over 0% but in the second test I saw a peak to 3%. The speeds didn’t change (nor did I expect them to, since my available throughput was already on display with the default settings), but offloading the hwnat definitely made a difference.
Enabling IPV6
Despite my expectations for the configuration wizard, the router did not obtain an IPv6 address from the ISP on its WAN interface, nor can I detect any configuration for dhcpv6-pd in the running config. I’ll need to handle this manually.
The goal is to use IPv6 PD (prefix delegation) to make my router and network participate in the IPv6 Internet. The ISP will delegate an IPv6 network to my router, which can then be used on my internal network. IPv6 doesn’t rely on NAT to conserve addresses, so (almost) every IPv6 address is a public, routable, unique address.
I will configure my router to request an IPv6 delegation with a prefix-length of 64, meaning the 128-bit IPv6 address is split in half with 64-bits for the network identifier and 64-bits for each of my hosts. There will be more addresses available to my home network than there are in 4 billion IPv4 Internets!
Using the CLI to configure this, I use these commands:
configure
set interfaces ethernet eth0 dhcpv6-pd rapid-commit enable
set interfaces ethernet eth0 dhcpv6-pd pd 0 prefix-length /64
set interfaces ethernet eth0 dhcpv6-pd pd 0 interface switch0 host-address ::1
set interfaces ethernet eth0 dhcpv6-pd pd 0 interface switch0 service slaac
set interfaces switch switch0 ipv6 router-advert prefix ::/64
set interfaces switch switch0 ipv6 router-advert managed-flag true
commit
save
exit
The above tells the router to enable dhcpv6-pd on the WAN interface (eth0) and to provide IPv6 service to hosts on interface switch0, which represents the rest of the ports on the router. Further, it tells the router to send router advertisements on the switch0 interface(s).
After a minute everything snaps into place and I can see the results of my configuration in a show interfaces command:
ubnt@ubnt:~$ show interfaces
Codes: S - State, L - Link, u - Up, D - Down, A - Admin Down
Interface    IP Address                        S/L  Description
---------    ----------                        ---  -----------
eth0         NN.NN.NN.NN/19                   u/u  Internet
             NNNN:NNNN:3fc0:3c:5dc3:813b:51a7:5aa9/128
eth1         -                                 u/u  Local
eth2         -                                 u/u  Local
eth3         -                                 u/D  Local
eth4         -                                 u/D  Local
lo           127.0.0.1/8                       u/u
             ::1/128
switch0      192.168.1.1/24                    u/u  Local
             XXXX:XXXX:1a0f:e::1/64
In the above, there is a /128 address assigned to my public eth0 interface. This is the address the Internet will use (via my ISP) to route IPv6 traffic to my network. There is a /64 address assigned to my private switch0 interface ending in “::1” but starting with “XXXX:XXXX:1a0f:e” which is the 64-bit network portion of my personal IPv6 address space.
Turning now to one of my computers, a Mac Mini, the output of ifconfig en0 will show me the IP info for a host connected to the router’s switch0 network:
en0: flags=8863<UP,BROADCAST,SMART,RUNNING,SIMPLEX,MULTICAST> mtu 1500
	options=10b<RXCSUM,TXCSUM,VLAN_HWTAGGING,AV>
	ether ac:87:a3:34:12:9a
	inet6 fe80::ae87:a3ff:fe34:129a%en0 prefixlen 64 scopeid 0x4
	inet 192.168.1.103 netmask 0xffffff00 broadcast 192.168.1.255
	inet6 NNNN:NNNN:1a0f:e:ae87:a3ff:fe34:129a prefixlen 64 autoconf
	inet6 NNNN:NNNN:1a0f:e:a8f8:65b2:e9e8:2119 prefixlen 64 autoconf temporary
	nd6 options=1<PERFORMNUD>
	media: 1000baseT <full-duplex,flow-control>
	status: active
In this output, notice that my host actually has three IPv6 addresses, noted by the inet6 prefix.
The first one, beginning with “fe80” is a Link Local Address, which is the portion of the IPv6 address space dedicated to private local networks; these addresses are not routed and are always auto-configured.
The other two are both part of my personal NNNN:NNNN:1a0f:e network. They both have a 64-bit prefix-length and are auto-configured, but one of them has a “temporary” identifier on it.
The non-temporary address is my host’s personal permanent address in the IPv6 world, and it’s derived from the 48-bit MAC address you see here labeled “ether”. Every ethernet interface in the world (minus forgeries) has a unique MAC address, which can be padded to become the lower 64-bits of a IPv6 address. If you look closely, you’ll see that the “ether” address is repeated as the last 4 sections of the first “inet6” address with a couple of changes: “fffe” is inserted in the middle of it, and the first c has been changed to a e. This is done according to rules, so it’s not some random thing.
The “temporary” address is there for privacy reasons. As I mentioned, the MAC address is unique, immutable, and permanent for its host. That means wherever I should go on the IPv6 Internet, it would be possible to correlate my activity even across networks! So instead, my computer has generated a second, temporary, private IPv6 address to use for outbound connections to the Internet. It will change every now and then and protect my personally-identifiable MAC address from the public.
Setting The Static Routes
It’s crazy to me that on top of all the other stuff this little $50 router does, it also supports OSPF, a routing protocol you’d find in large enterprise and service provider networks. It’s not BGP, which is the routing protocol that runs the Internet, but OSPF is a very popular “interior” routing protocol. I won’t be using it right now, but I will set up a static route.
You put a static route in a router when you need that router to remember a particular route but don’t have another way of getting it in there. By default, a router knows about the networks it’s connected to (i.e., those networks on which it has an address) and those it’s learned about via a routing protocol like OSPF or BGP. For everything else, there are static routes.
The only reason I’m putting a static route on this guy is that my Motorola Cable Modem has a fixed management IP address of 192.168.100.1 that will be unreachable to me in any ordinary manner. The cable modem sits outside the “WAN” interface of the router, which obtains a public Internet address from the ISP, which can not be used to reach the cable modem.
With a static route, I can tell the router that this address exists out there so it knows how to get to it. That way, I can access the management interface of the cable modem without jumping through a lot of other service-interrupting hoops should I need to. Though I performed this action in the GUI, the resulting CLI command is this:
set protocols static interface-route 192.168.100.1/32 \
    next-hop-interface eth0 description 'Cable Modem'
I’ve broken the above into two lines for readability’s sake. This command adds a static route to the cable modem via interface eth0, the public WAN interface. The /32 means it’s a route to this address and this address only, not anything else on the 192.168.100.x network. This works, and I can access the cable modem’s management interface from my internal network. It is not reachable from the Internet at large because 192.168.0.0/24 is an RFC1918 address, i.e., private and not routable on the Internet.
Enabling DPI and SNMP
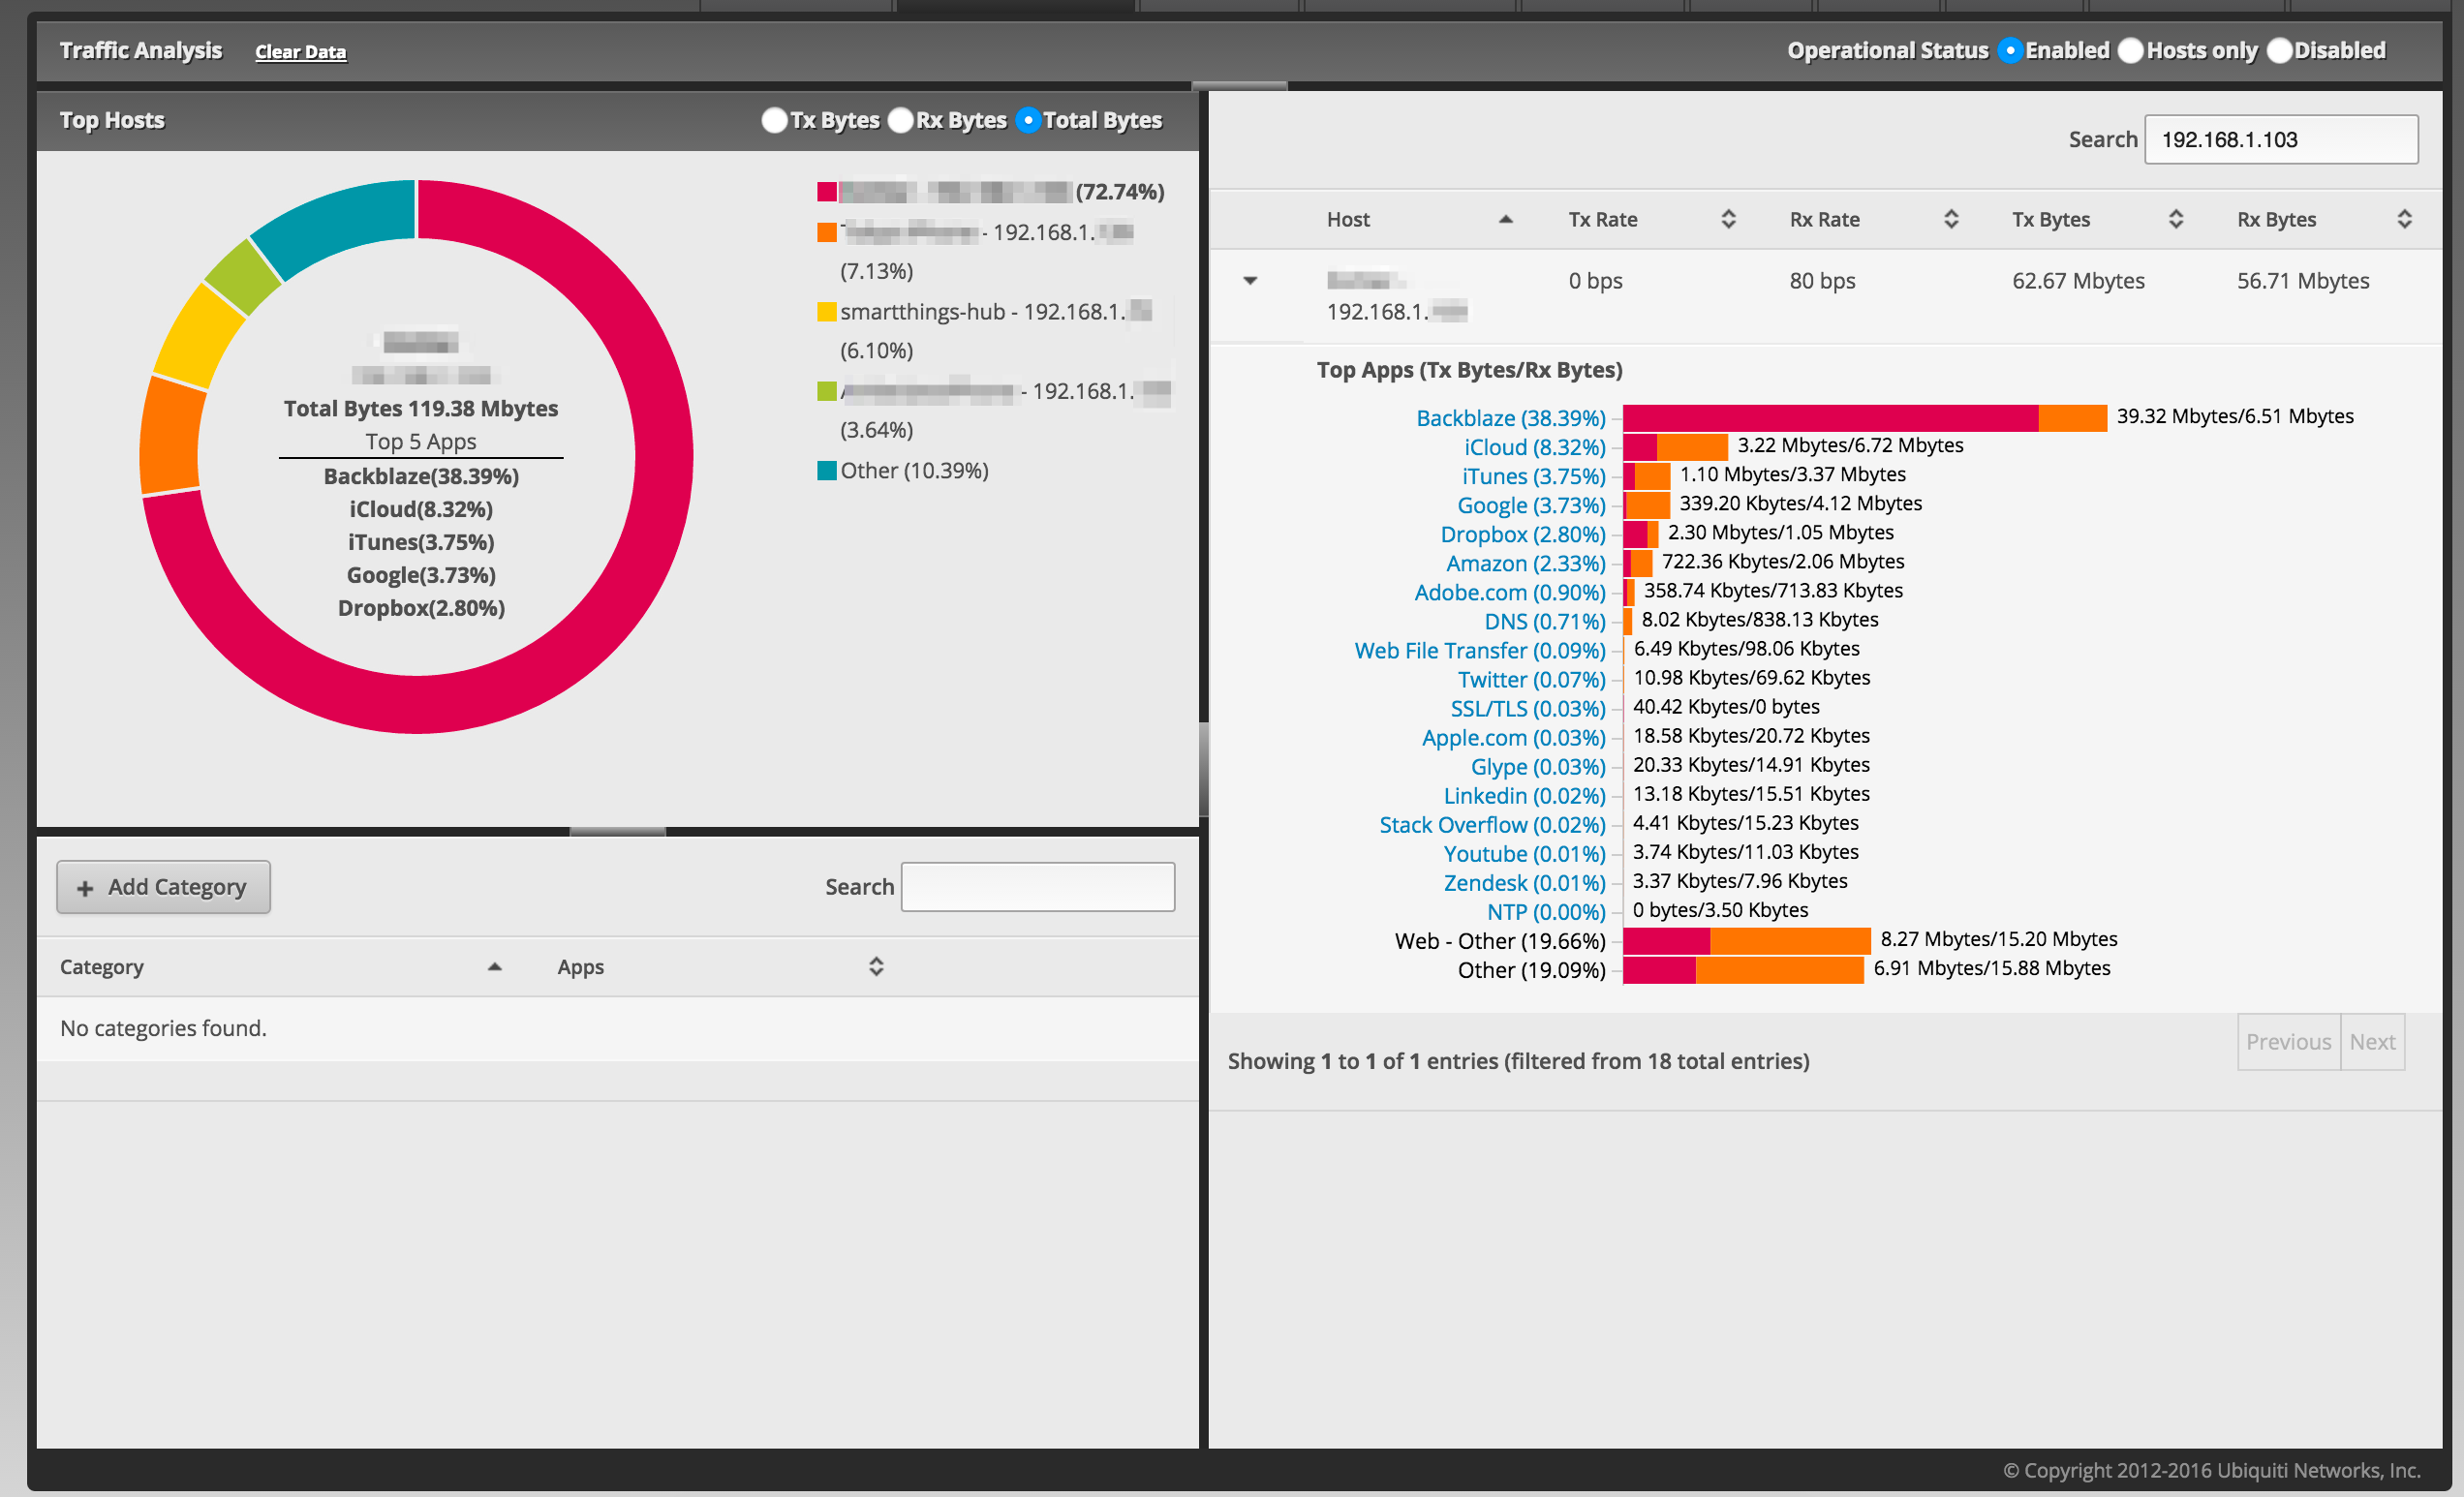
In the EdgeOS GUI you get some cool real-time charts and graphs of transmit and receive counters by interface, and there’s a Traffic Analysis tab that promises to show you really cool stuff if you would just press the “enable” option. Sure, it’d be great to see which host on the network is consuming all the bandwidth, and that rich DPI information is just a click away.
Unfortunately, while the relative stats provided by the Traffic Analysis DPI seem accurate in ranking hosts by data usage and highlighting the applications in use, the actual numbers aren’t accurate at all.
Streaming a Netflix video and downloading a DVD-sized Linux ISO with DPI enabled doesn’t eat up a ton of bandwidth, and it doesn’t seem to stress the router’s CPU, either, with peaks around 12% and still less than 30% memory in use. This mirror managed to source close to 180 mbps for a while, though, and the router didn’t seem to break a sweat. On the other hand, according to Traffic Analysis, nothing of note was happening despite streaming at 3-5 mbps and downloading a file at many times that rate. Despite the assertions to the contrary, the ERX might not expose hardware-offload traffic to the DPI engine. I could disable offload and test, and I might, but it’ll be later.
The charts on the dashboard page seem much more accurate, but given their transient nature they’re good for real-time monitoring but not historical record-keeping. Traditionally it’s the job of the SNMP protocol to expose vital stats for collection and storage, and this router appears to support SNMP. I won’t detail the usage of that protocol in this post, but I’ll make it a goal to collect stats via SNMP, store in ElasticSearch and display in Grafana. For now, though, I’ll turn on the SNMP stuff in the router GUI and come back to it later.
Again, I did it through the GUI but here is the CLI command set to turn on SNMP:
set service snmp community public authorization ro
set service snmp contact me@here.net
set service snmp location Anytown USA
I’m guessing this is SNMP v2, which is very prevalent and not very secure. The “community” command is like setting a password on the SNMP stack, and the “contact” and “location” settings are just fluff. Obviously, the real config has different values in these places, and you can see the SNMP community is limited to read-only (ro) access. This is not configurable. There exists SNMP v3 which supports robust security and encryption, but it is not supported here.
Conclusion
The EdgeRouter X is not a plug-and-play device. I think the initial wizard config is sufficient for 80% of SOHO networks, but some services like VPNs, IPv6, UPNP, Port Forwarding, etc., will take some extra configuration. The GUI is slick and generally useful (it doesn’t seem to work well in Safari, though, so I used Chrome). The CLI is powerful but not as well documented, but the fact that every configuration action results in a discrete CLI command means you can easily save, archive, and version-control your configs and copy-paste in a complete working configuration if you ever paint yourself into a corner.
For $50 it’s amazing what this little guy can do, and the feature set meets or exceeds Enterprise-level gear. If you don’t need the UTM features of something like PFSense, the Ubiquiti gear is a great tool.
Addendum (Added Oct 2, 2016)
It might be worth noting that the stateless IPv6 configuration can still be used to tell clients to use specific IPv6 DNS servers, which I accomplished on the ERX with these commands:
set interfaces ethernet eth0 dhcpv6-pd pd 0 interface switch0 no-dns
set interfaces switch switch0 ipv6 router-advert other-config-flag true
set interfaces switch switch0 ipv6 router-advert name-server 2001:4860:4860::8888
set interfaces switch switch0 ipv6 router-advert name-server 2001:4860:4860::8844
The above set of commands first tells the system not to propagate the DNS config received from the ISP, then to instead use Google’s IPv6 DNS addresses. The “other-config-flag” setting enables this extra stuff in the v6 Router Advertisements from the ERX, though technically setting the “O” flag is redundant if the “M” flag is also set. The downside to this setup is that Windows doesn’t make use of the “RDNSS” portion of SLAAC.