Automating the ERV Part 1
Previously, I wrote about adding Z-Wave functionality to my ERV. With that in place, I can use SmartThings to perform automation of this appliance in an intelligent manner, or at least with something approaching intelligence.
A good place to start is to automate some of the operational features that would have been present in one of the advanced main controls. My ERV was installed with a simple on-off switch as its main control, but an available “Programmable 5-Speed/4-Mode Control” exists that adds a lot of functionality that you’d find in a programmable thermostat like run schedules. There are also optional timers that provide high-speed override operation in 20-minute increments.
All of this requires that you go to where the control is located and press some buttons. There are three main operational profiles for the ERV I’d like to reproduce as automation rules:
- Continuous Ventilation Mode. This is pretty straight-forward. The ERV is simply operating at High or Low speed. The automation of this mode means I don’t have to go downstairs to start flipping switches.
- 20 Minutes On, 40 Minutes Off. This mode does what it says; for every hour, the ERV operates for 20 minutes.
- Timer Operation. Press a button, and the ERV runs for 20/40/60 minutes. This is on-demand operation.
That’s the-out-of-the-box stuff. Let’s consider how to make it happen, then I’ll think about whether it’s a good idea.
Continuous Ventilation Mode
This is a solved problem from the outset. I have two switches connected to the ERV to turn it on or off or switch from low to high-speed ventilation. The mere fact that these switches are Z-Wave devices enrolled in SmartThings means all I have to do is open the SmartThings app and press the buttons to turn one or both of the switches on.
What you get is dumb open-ended operation. The things stay on until you get around to turning them off again.
We can make this a little bit fancier using SmartThings “Routines” which are the easy way to set up automation of Things, accessible to anyone using the platform without requiring any extra programming or even a visit to the developer site.
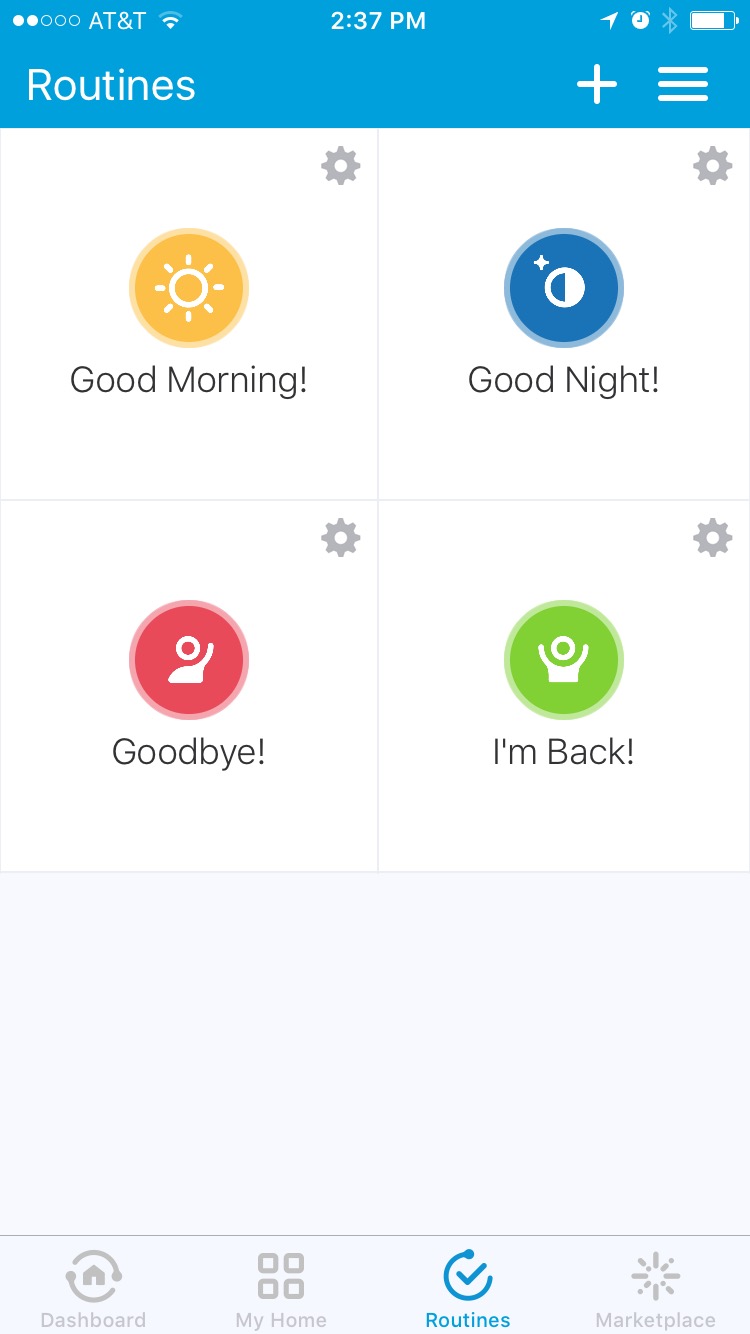
SmartThings ships with four routines – “Good Morning”, “Good Night”, “Goodbye,” and “I’m Back” – which by default don’t do anything besides set the “Mode” of the system, e.g., Home, Away, Night. You can add new modes and routines, and alter the default routines.
One cool thing about Routines is that you can, at least on iOS, set a routine to be displayed as a Widget on the Today notification pane of your smartphone. This makes it easy to, say, run the “Good Night” routine when you go to bed and the “Good Morning” routine when you get up with just a couple of swipes (or, if you have a smart bed, these things can happen automatically!).
Let’s create a Routine for ERV Ventilation and make it available as a widget. This will satisfy the use case of Continuous Ventilation Mode – on-demand high-speed operation of the ERV irrespective of any other inputs.
Start by launching the SmartThings app. It may launch directly into the Routines tab; if not, select Routines from the tab bar and press the “+” at the top to create a new routine.
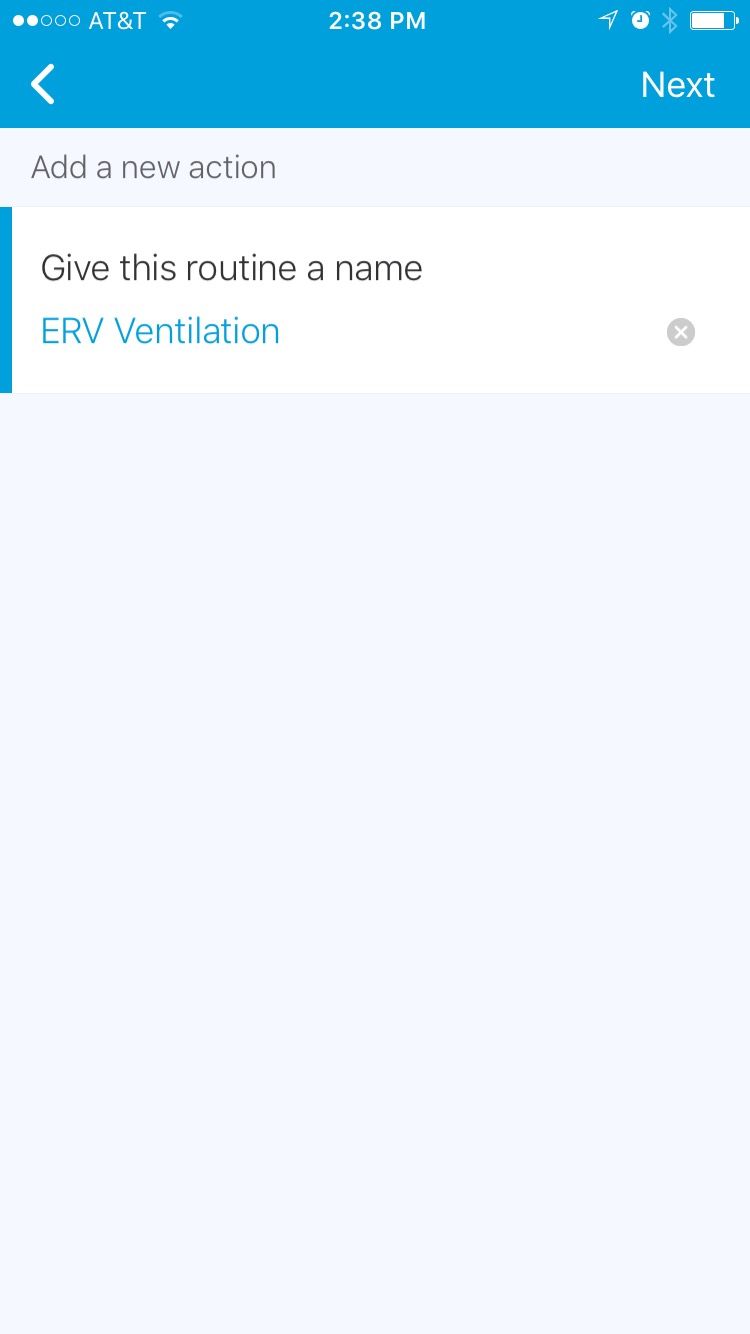
The routine first requires a name, and I’ll call it “ERV Ventilation,” and press Next.
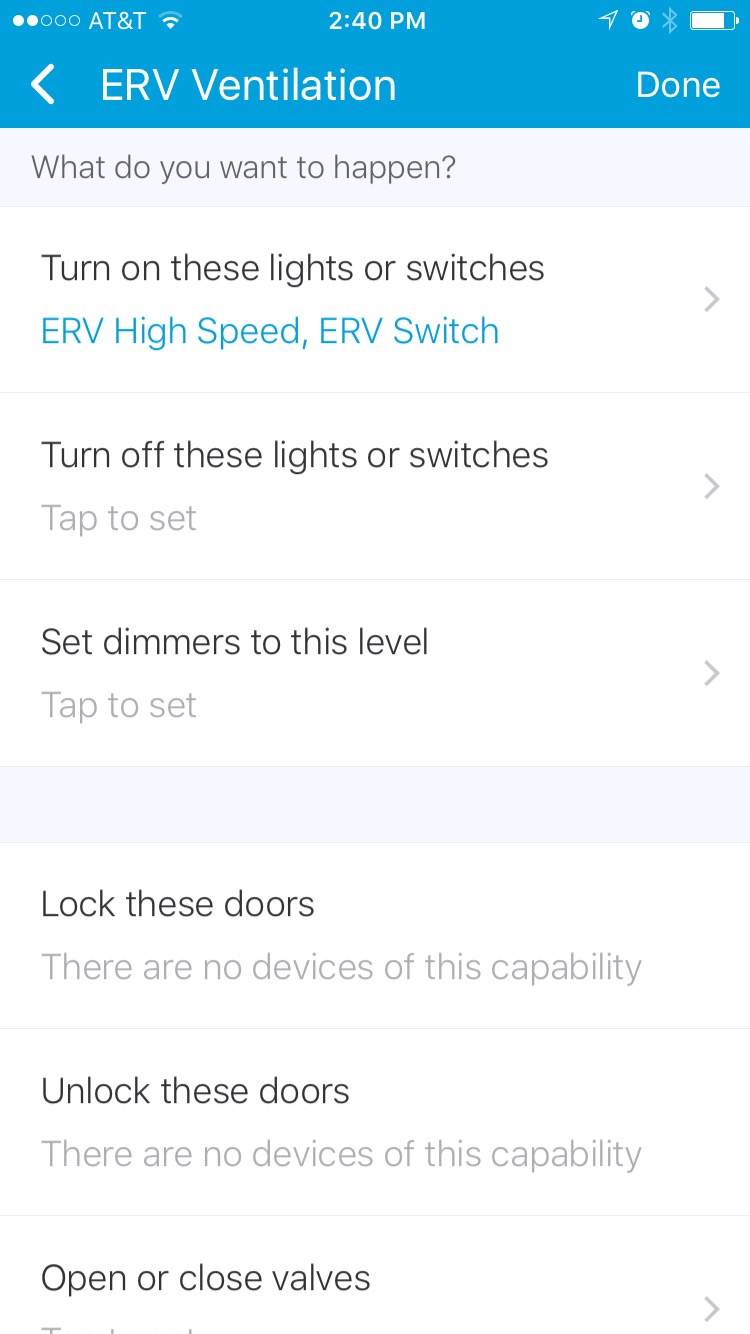
The next page is a long list of things we can have the routine do. It’s broken out into sections for different type of smart devices like switches, valves, door locks, thermostats, etc. My requirements are simple, so I’ll select “Turn on these lights or switches,” and from the resulting list of options I pick the two ERV switches.
Towards the bottom there’s an interesting option for the Routine called “Automatically perform…” which presents a number of conditions I can set that would trigger this routine automatically (and/or restrict its execution based on date, time, or platform mode). The options are pretty limited: I can use presence, time, motion, or open/close sensors to trigger the routine.
If I think about the types of triggers upon which Continuous Ventilation might depend, none of these are particularly fitting. There’s no option for “someone flushes a toilet” or “indoor air quality threshold”, if you catch my drift.

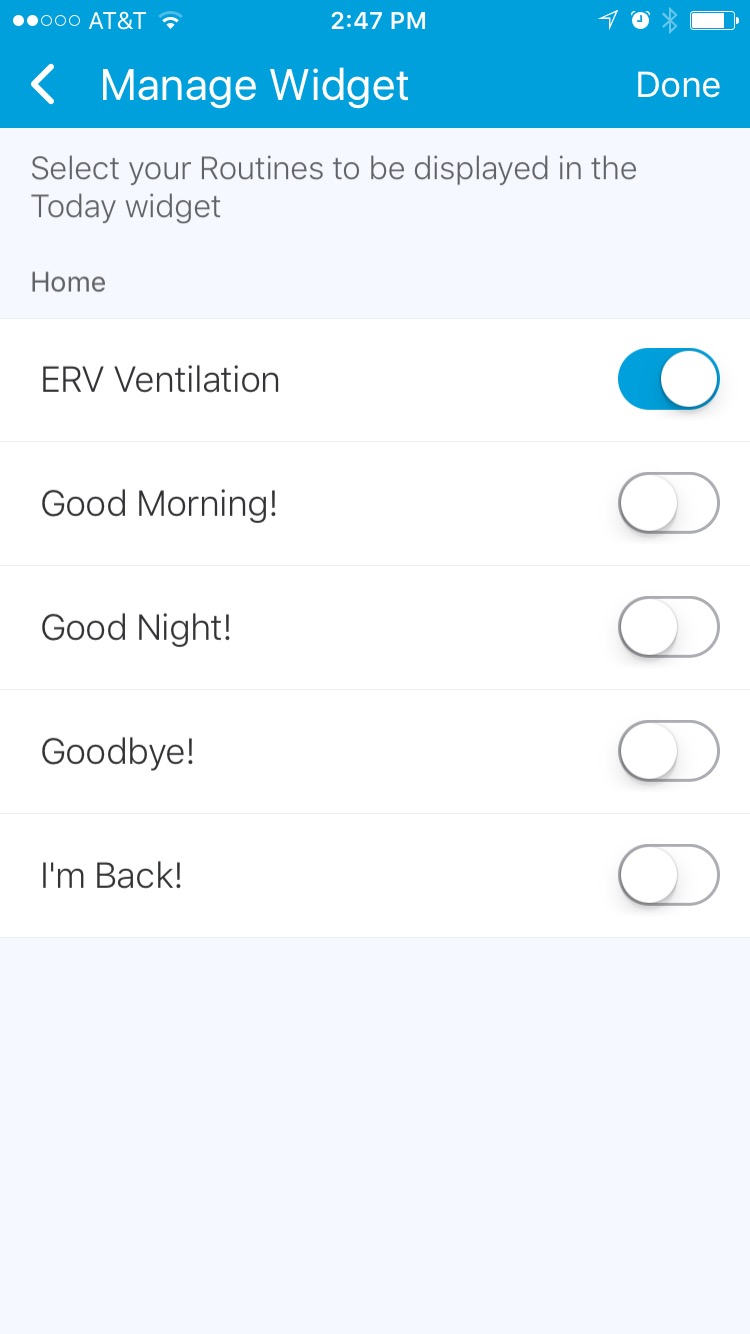
For now I’ll leave these options alone and say that I’m “Done” with my routine. The routine is now installed and available in the app. I can put it on my notification page, but the procedure to do so is unintuitive:
- Press the hamburger menu in the upper right.
- Select “My Account” from the resulting pane.
- Select “Manage Widget and Watch”
- Turn on the selection for the ERV Ventilation routine.
- Press Done, click the X, and tap some empty space on the screen to exit back out to where I was.
That last step is mildly infuriating – there are at least three different ways to exit/close/go back in the SmartThings app. But the result is good: I can now trigger the ERV Ventilation routine from my notification page and affect high-speed ERV operation whenever I need it, wherever I am.
Timer Operation
Setting up a routine to manage my on-demand ERV operation was simple, straightforward, and more or less satisfying. Unfortunately it only turns on the ERV without providing a way to turn it off, either manually or after a given amount of time. Ultimately, it’s really not very useful as a tool to automate the operation of an important home appliance; it’s only one small piece of the whole.
I’m unlikely to want continuous uninterrupted ERV operation. I need to be able to turn it off (which I can do by using the app to find the switches and toggle them, but I need to remember to do so), and ideally that would happen after some amount of time, say 20 minutes. Or 40, or 60, just like the physical timer controls would allow.
A SmartThings routine doesn’t have an option that says “stop this routine after X minutes”. One option would be a second routine that turns off the two ERV switches; this at least would give me access to stop ventilation that is as easy as starting it, but I don’t like that approach. I want hands-off timed operation: when I start my ERV ventilation routine, I want it to stop after 20/40/60 minutes.
Enter the SmartApp. To do this, I’ll have to write some code to make it happen. A SmartApp is a program that you write in Groovy. At a high level, it consists of a subscription and an event handler, such that when something happens to which the app subscribes (a switch is flipped, or a routine is executed), some piece of code (the event handler) is executed in response.
If I were to describe the purpose of a proposed SmartApp, I could say:
When the routine “ERV Ventilation” is performed, wait 20 minutes and turn off the ERV switches.
I can break that idea into a subscription (“When the routine is performed”) and an event handler (“wait 20 minutes and turn off the switches”). As a starting point, that’s pretty decent.
There are multiple ways to create a new SmartApp, but they all start by logging into the SmartThings developer portal and visiting the “My SmartApps” page. After pressing “New SmartApp” from this page, you can create a new SmartApp “From Form,” in which you fill out a few details and get some skeleton code in return, “From Code,” in which you get a blank app to start typing away on, and “From Template,” in which you start with a complete SmartApp that you want to change, customize, or improve.
For this thing, I’ll pick “From Form” and go from there. The form fields include:
- Name: a name for the SmartApp. I’ll call it “ERV Timed Operation”.
- Description: just what it sounds like. The description for this SmartApp is “Reacts to the ERV Ventilation routine and schedules a task 20/40/60-minutes in future to turn the ERV back off.”
- Category: SmartThings categorizes public and private SmartApps in many ways. I’ll pick “Green Living” here because why not?
I’ll leave the rest of the fields at their defaults and press the “create” button. This gives me a skeleton SmartApp in the SmartThings IDE (Integrated Development Environment), where I can start writing my app. This skeleton is several sections of Groovy code starting with “definition”, which is populated by the form values specified a minute ago.
The next section, “preferences”, looks like this:
preferences {
	section("Title") {
		// TODO: put inputs here
	}
}
Not very helpful, but SmartApp development isn’t particularly friendly and it’s definitely not menu-driven. It does tell me what to do: “put inputs here.”
An “input” is a device with which this SmartApp will interact. I know of at least two such devices I need for this SmartApp: the ERV on/off switch, and the ERV high/low switch, because the whole point of this app is to turn them off at some point.
preferences {
	section("ERV Switches") {
		input "switches", "capability.switch",
		title: "Which ERV switches?", multiple: true
	}
}
The above will have the SmartApp prompt me to select one or more devices (“multiple:true”) that are switches (“capability.switch”), and make them available in later code by the name “switches”. The title specified will remind me what kind of switches to select.
The next section of the app consists of an installed, updated, and initialize section:
def installed() {
	log.debug "Installed with settings: ${settings}"

	initialize()
}

def updated() {
	log.debug "Updated with settings: ${settings}"

	unsubscribe()
	initialize()
}

def initialize() {
	// TODO: subscribe to attributes, devices, locations, etc.
}
There’s nothing for me to do under installed or updated. The instructions here are sufficient: when the SmartApp is installed, it logs a little information and calls the initialize method. Likewise, when the SmartApp is updated, it logs a little bit and calls the unsubscribe and then the initialize method.
The unsubscribe method is baked-in; I don’t have to write it. Both of these things have initialize in common, though, and under initialize the skeleton code has given me a TODO: subscribe to things.
I already know what I want to subscribe to: “When the ERV Ventilation routine is performed”. Now I need to express that idea as Groovy code within the initialize() method. This is described in the SmartThings developer documentation.
def initialize() {
	subscribe(location, "routineExecuted", routineChanged)
}
That’s pretty simple. A little too simple. This SmartApp will execute whenever any routine is executed, so in my event handler I have to make sure I respond only to the routine I care about. The name of the event handler method is routineChanged, so this is what I need to write next.
def routineChanged(evt) {
	if (evt.displayName == "ERV Ventilation") {
		// TODO: wait 20 minutes and turn off the ERV switches
	}
}
In the above I define a routineChanged method that will include an event named evt. That event object will have a property named displayName which will contain the name of the routine. I’ve created an if statement to check if the event routine is the ERV Ventilation, and if it is, I’ve given myself a TODO.
Let me flesh that out a little more.
def routineChanged(evt) {
	if (evt.displayName == "ERV Ventilation") {
		log.debug "${evt.descriptionText}"
		def operationTime = 20 * 60 //20 minutes * 60 seconds
		runIn( operationTime, turnOffERV)
	}
}
Here I do three things: write to the log the contents of the event’s descriptionText which will be along the lines of “ERV Ventilation was executed”; calculate the number of seconds in 20 minutes; tell the platform to execute the method turnOffERV in operationTime seconds. The runIn method is a SmartThings scheduler.
My next task is to write the turnOffERV method.
def turnOffERV() {
	switches.each {
		it.off()
	}
}
This is pretty barebones: in the turnOffERV method I refer to the object switches, which is a list of the devices specified when the SmartApp was installed (see up above about the preferences). It can be one, two, or ten switches; my SmartApp doesn’t have to care. The method goes to each of the switches and tells it to turn off(). This simplicity is thanks to Groovy; the default name of an item in a collection is “it.”
Right now this is a complete SmartApp that I can save, publish, and install. It will sit quietly until a routine is executed, then it checks whether the routine was “ERV Ventilation,” and if it was, it will schedule a task 20 minutes in the future that will turn off any and all specified switches. No muss, no fuss, no fancy logic.
I want to do one more thing before I finish, though. Right now, the SmartApp has a hard-coded value of 20 minutes. I want to make this a variable value. To do so, I’ll first modify the SmartApp preferences and add a new input:
preferences {
	section("ERV Switches") {
		input "switches", "capability.switch",
		title: "Which ERV switches?", multiple: true
	}

	section("Timer Duration") {
		input "minutes", "number", required: true, title: "How Long (minutes)?"
	}
}
Next I’ll modify the routineChanged method to use this input value instead of “20”:
def routineChanged(evt) {
	if (evt.displayName == "ERV Ventilation") {
		log.debug "${evt.descriptionText}"
		def operationTime = minutes * 60 //n minutes * 60 seconds
		runIn( operationTime, turnOffERV)
	}
}
That should do it. I “Save” and “Publish” my SmartApp. Now it’s back to the SmartThings app on my iPhone to install and configure it.
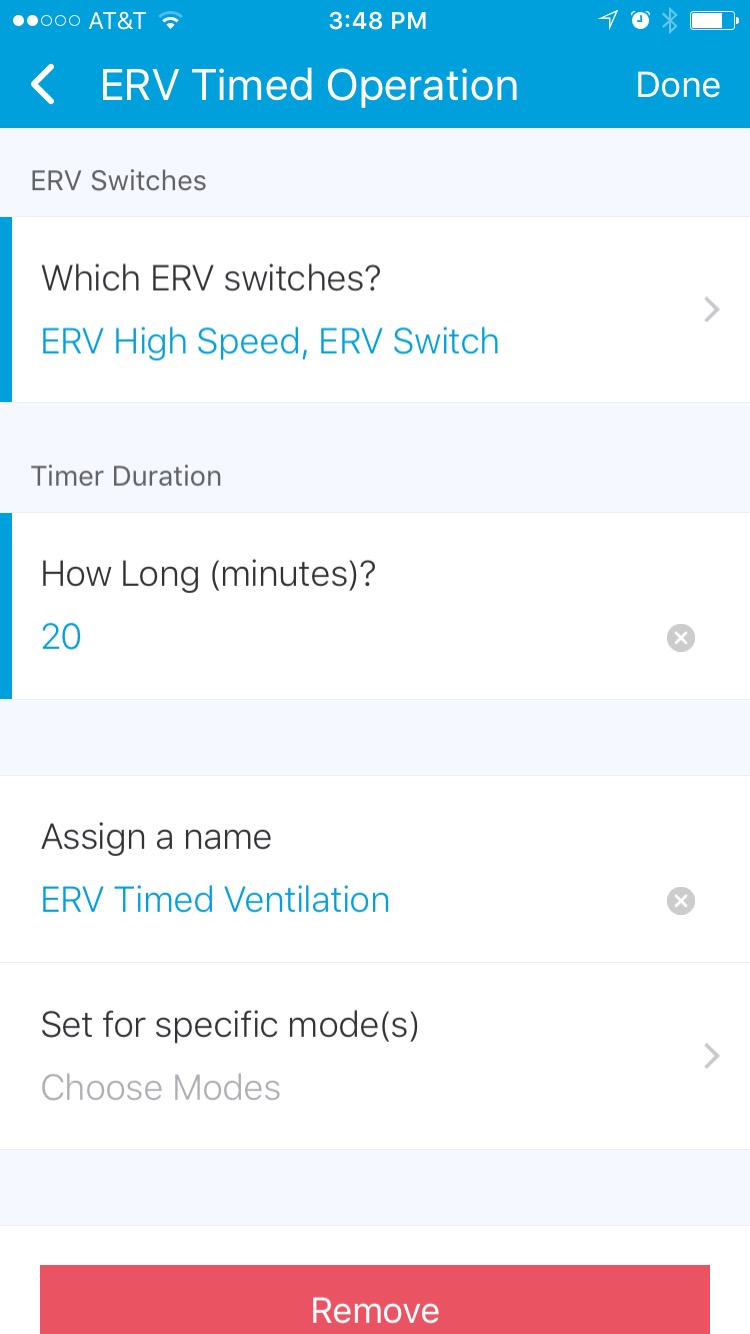
Select the “Marketplace” bottom tab followed by the “SmartApps” top tab. At the bottom of the list is “My Apps” and within that list I can find my new app, “ERV Timed Operation”. When I press that, I am given the opportunity to configure the SmartApp based on the preferences I set up. I choose my two ERV switches, specify 20 minutes, and give a name to my installed app. When I press “Done,” I’m told that the app is now installed and automating.
Back on the developer page, I have to go to “Live Logging” to see anything happen. One drawback of the SmartThings platform is its logging ability: the developer web site is the only place to see your logs. Anyway, while I’m watching the log feed I will execute the “ERV Ventilation” routine and see what happens. I should see log entries from both the routine and the SmartApp.
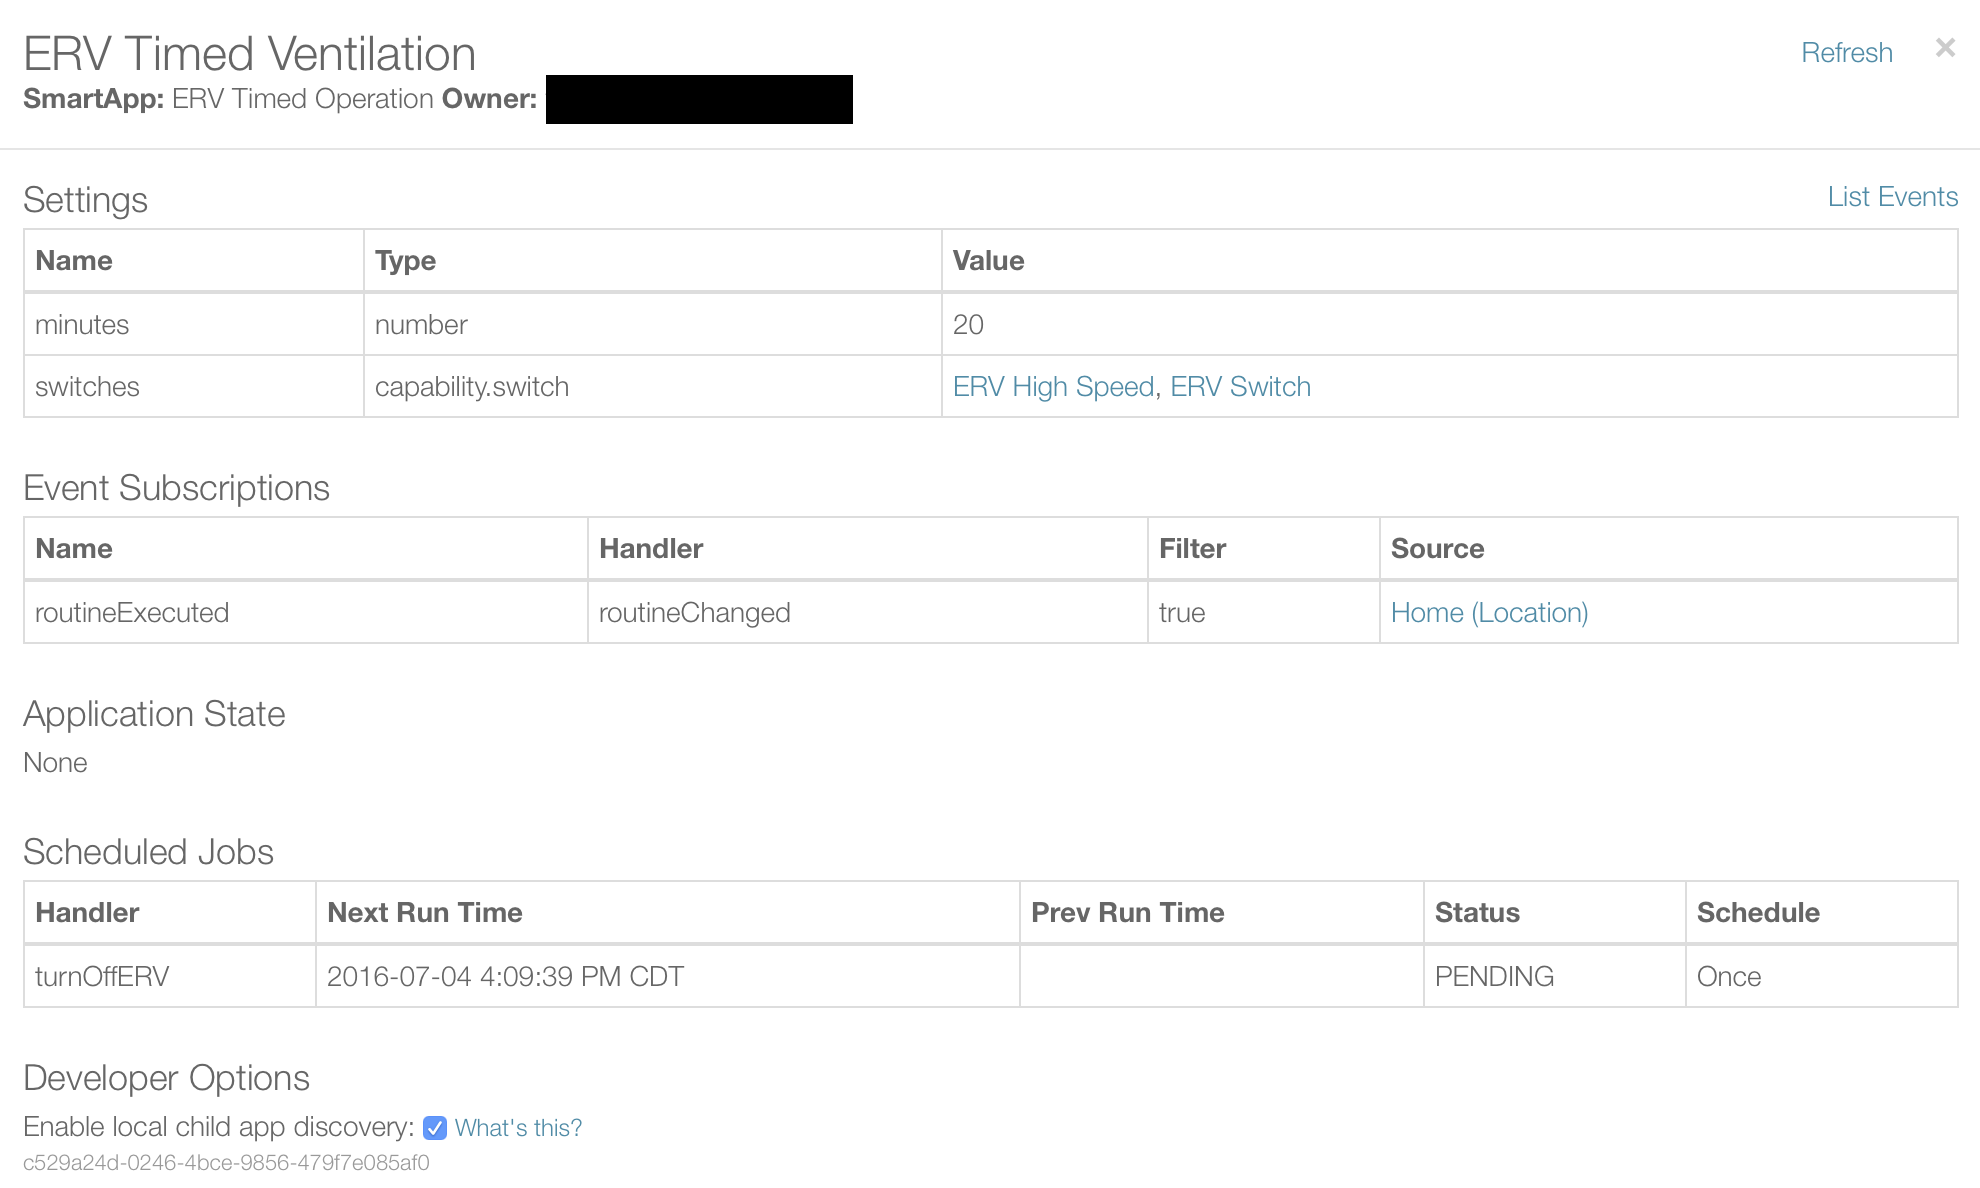
If I go to “My Locations” and at the bottom select “List SmartApps” then find and click on my “ERV Timed Ventilation” app I can see that it has a Scheduled Job for “turnOffERV” that’s set to occur in around 20 minutes.
After the scheduled time arrives, I can verify that the ERV switches are turned off by visually inspecting them in the SmartThings app, refreshing the SmartApp display shown above, and by checking my Grafana dashboard which shows when the ERV has been running. In the following graph the ERV was on from just before 3:50pm when I executed the routine until just before 4:10pm, after 20 minutes had elaspsed.

In Part 2 of this exploration, I’ll add more intelligence to the ERV operation and have it react to outdoor conditions and bathroom humidity levels when deciding whether to run.